
Snort is an open-source instrusion decetion and provention service which uses rule-based detection to help prevent systems and networks. Snort can also be used to complete packet capture and analysis.
This walkthrough is designed to demonstrate the use of snort as a real-time IPS for both inbound and outbound malicious traffic through tryhackme’s room “Snort Challenge- Live Attacks.”
This room utilizes two seperate Virtual machines, one for inbound traffic and one for outbound traffic. To start, we will read the introduction task, mark it as complete, and open task 2.
We start by clicking the green “Start Machine” button on the top right and read the scenario while the machine “spins up.” The scenario describes a small coffee shop having difficulties keeping their digital property safe. The “Virtual assistant” alerts to a possible brute force attack and requests that the traffic be analyized and that a snort rule written to stop the attack.
Once the machine is operational, we click on the terminal emulator button on the top left of the virtual desktop to get our bash prompt.
First we need to enable snort to capture packets so that we can analyize the data and determine the attack vector. From the prompt we can use the command sudo snort -d to let snort start to sniff packets. The use of the modifer -d instructs snort to display the packets.

Once snort has run for a little bit of time, I ran snort for about 45 seconds, and you see multiple packets filled with data on the screen, you can use the command Ctrl+c to stop the service and restore your prompt.
Scrolling up through the packet results, we can see a packets with some significant important data show up. We will be able to use this data to design our rule to stop the attack as well as answer some questions at the end of this task.
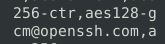
If we take a look at the header for the packet we can immeadiately see what port and protocol is being used as the source of this traffic into our stystem.

The utilized port is 22, and the traffic is using TCP as the connection protocol. Looking at the data from the packet itself, we can get a clue about the service the attack is targeting.
Now we can begin to write our rule to block this malicious inbound traffice. We can open the local rules file using the command: gedit /etc/snort/rules/local.rules . We can then write a quick rule to alert on any incoming traffic on port 22 which contains “ssh.” The rule would look like: alert tcp any any <> any 22 (msg: “SSH traffic found”; content: “SSH”; sid: 2000001; rev:1;) . Be sure to save and exit the edit window. We can then test the rule using the modifer -c to designate the configureation and -A console to display the alerts in the console window. The command to run this is: sudo snort -c /etc/snort/snort.conf -A console . If we see alerts displaying in the console, we know that the rule is blocking traffic as desired. We can use Ctl+c to stop the service and finally run snort in full mode using the command: sudo snort -c /etc/snort/snort.conf -A full . After snort has been running for a minute, the flag.txt fule should appear on our desktop and we can use Ctrl+c to stop the service. Opening the TXT file on the desktop reveals our flag and we can answer our questeions.
Stop the attack and get your flag
Opening the flag.txt file reveals our flag which we can enter here.

What is the name of the service under attack
Reviewing the packet we sniffered earlier, we can see that the service under attack was, ssh.
What is the used protocol/port in the attack?
Again, reviewing the sniffed packet from earlier, we can see that the protocol was TCP and the port was 22.
Click below to continue on to part three of this room